How To Integrate Razorpay Payment Gateway In Laravel 9
Websolutionstuff | Apr-11-2022 | Categories : Laravel PHP
In this article, we see how to integrate razorpay payment gateway in laravel 9. As you all know if you are developing an e-commerce website then you must need a payment system to buy and sell your product on your website and at that time we require any type of payment integration required in the website. razorpay payment gateway integration is very easy to use like other payment gateways.
So, let's see razorpay payment gateway integration in laravel 9, laravel 9 razorpay payment gateway integration, laravel razorpay integration, razorpay api.
Step 1: Install laravel 9
Step 2: Create an account in razorpay
Step 3: Install razorpay package
Step 4: Add key and secret key
Step 5: Create a route
Step 6: Create controller
Step 7: Create view
In this step, we will install laravel 9. So, copy the below command and create laravel 9 application.
composer create-project --prefer-dist laravel/laravel laravel_9_razorpay_integration
Now, we need to create a razorpay account using the below link and create a test account for testing purposes.
Create an Account: Razor Pay Login
Now, we need to install razorpay/razorpay package in laravel. So, copy the below command and run it in your terminal.
composer require razorpay/razorpay
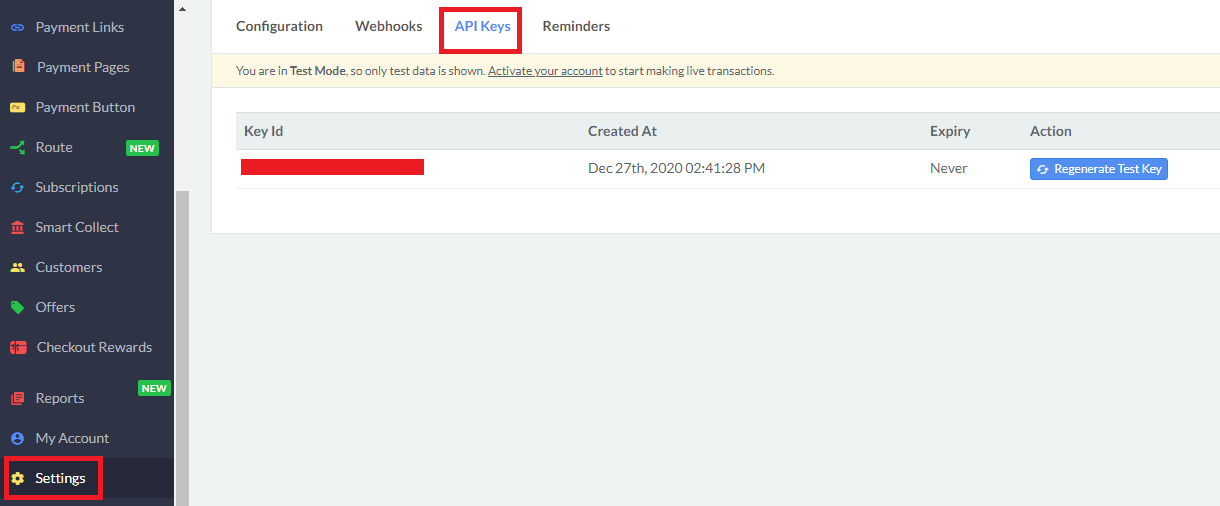
Now, we need to add a key and secret key in the .env file for razorpay API integration. You can find these keys from the setting menu of the razor pay dashboard.
RAZOR_KEY=xxxxx
RAZOR_SECRET=xxxxx
Now, we are creating a route for payment and action. So, add the below code in web.php.
Route::get('razorpay', [RazorpayController::class, 'razorpay'])->name('razorpay');
Route::post('razorpaypayment', [RazorpayController::class, 'payment'])->name('payment');
In this step, we are creating RazorpayController for this location app/Http/Controllers.
<?php

namespace App\Http\Controllers;

use Illuminate\Http\Request;
use Razorpay\Api\Api;
use Session;
use Redirect;

class RazorpayController extends Controller
{
    public function razorpay()
    {
        return view('index');
    }

    public function payment(Request $request)
    {
        $input = $request->all();
        $api = new Api(env('RAZOR_KEY'), env('RAZOR_SECRET'));
        $payment = $api->payment->fetch($input['razorpay_payment_id']);

        if(count($input)  && !empty($input['razorpay_payment_id']))
        {
            try
            {
                $response = $api->payment->fetch($input['razorpay_payment_id'])->capture(array('amount'=>$payment['amount']));

            }
            catch (\Exception $e)
            {
                return  $e->getMessage();
                \Session::put('error',$e->getMessage());
                return redirect()->back();
            }
        }

        \Session::put('success', 'Payment successful, your order will be despatched in the next 48 hours.');
        return redirect()->back();
    }
}
Now, create a view file for form and output. So, we have created index.blade.php file
<!DOCTYPE html>
<html>
<head>
    <title>How To Integrate Razorpay Payment Gateway In Laravel 9 - Websolutionstuff</title>
    <meta name="csrf-token" content="{{ csrf_token() }}">
    <link rel="stylesheet" href="https://maxcdn.bootstrapcdn.com/bootstrap/4.0.0/css/bootstrap.min.css">
    <script type="text/javascript" src="https://code.jquery.com/jquery-3.3.1.js"></script>
	<script src="https://maxcdn.bootstrapcdn.com/bootstrap/4.0.0/js/bootstrap.min.js"></script>
</head>
<body>
<div class="container">
    <div class="row">
        <div class="col-md-12">
            @if($message = Session::get('error'))
                <div class="alert alert-danger alert-dismissible fade in" role="alert">
                    <button type="button" class="close" data-dismiss="alert" aria-label="Close">
                        <span aria-hidden="true">×</span>
                    </button>
                    <strong>Error!</strong> {{ $message }}
                </div>
            @endif
            {!! Session::forget('error') !!}
            @if($message = Session::get('success'))
                <div class="alert alert-info alert-dismissible fade in" role="alert">
                    <button type="button" class="close" data-dismiss="alert" aria-label="Close">
                        <span aria-hidden="true">×</span>
                    </button>
                    <strong>Success!</strong> {{ $message }}
                </div>
            @endif
            {!! Session::forget('success') !!}
            <div class="panel panel-default" style="margin-top: 30px;">
                <h3>How To Integrate Razorpay Payment Gateway In Laravel 9 - Websolutionstuff</h3><br>
                <div class="panel-heading">
                    <h2>Pay With Razorpay</h2>

                <!-- <div class="panel-body text-center"> -->
                    <form action="{!!route('payment')!!}" method="POST" >
                        <script src="https://checkout.razorpay.com/v1/checkout.js"
                                data-key="{{ env('RAZOR_KEY') }}"
                                data-amount="1000"
                                data-buttontext="Pay 10 INR"
                                data-name="Websolutionstuff"
                                data-description="Payment"
                                data-image="https://websolutionstuff.com/frontTheme/assets/images/logo.png"
                                data-prefill.name="name"
                                data-prefill.email="email"
                                data-theme.color="#ff7529">
                        </script>
                        <input type="hidden" name="_token" value="{!!csrf_token()!!}">
                    </form>
                </div>
            </div>
        </div>
    </div>
</div>
</body>
</html>
Add below details for trial:
Visa Card No: 4111111111111111
Mobile No: 9876543210
OTP No: *****
Output:
You might also like :
- Read Also : Laravel 9 CRUD Operation Example
- Read Also : Laravel 9 Barcode Generator Example
- Read Also : How To Create Dynamic Pie Chart In Laravel 9
- Read Also : How To Send Email With Attachment In Laravel 9
Recommended Post
Featured Post

Laravel 11 Simple Pagination E...
Hello developers! In this article, we'll see the laravel 11 simple pagination example. Here, we'll use Bootstrap...
May-03-2024

Laravel 8 Yajra Datatable Exam...
In this article, we will see the laravel 8 yajra datatable example tutorial. Datatable provides users to many...
Sep-30-2020

Carbon Add Minutes In Laravel
In this example, we will see carbon add minutes in laravel. Here we will give you a simple example of laravel carbo...
Dec-11-2020

How To Disable Specific Dates...
In this tutorial, we will see how to disable specific dates in jquery datepicker. The jQuery UI Datepicker is...
Jun-16-2022