How To File Upload Using Node.js
Websolutionstuff | Jul-26-2021 | Categories : Node.js
In this example, we will delve into the process of performing file uploads using Node.js. This tutorial will provide you with a straightforward demonstration of file uploads in Node.js, specifically with Express.js and the Multer module.
We'll use the Multer module, a widely-used Node.js middleware, to handle multipart/form-data, making it the go-to choice for file uploads in web applications. By the end of this tutorial, you'll have a clear understanding of how to implement file uploads, enhancing the functionality of your Node.js applications
Visit Multer Package : Install Multer Module
So, an example of file upload in node js and express js using multer. let's start.
In this step create node application using below command
mkdir express_js_file_upload

cd express_js_file_upload

npm init
In this step, we install ejs using below command
npm install ejs
Now install Express in the express_js_file_upload directory and save it in the dependencies list. For example:
$ npm install express --save
In this step install multer using the below command. Also, you can visit the link Install multer module.
npm install multer
in this step create File_upload_form.ejs in the views folder. and copy the below code in the file.
<!DOCTYPE html>
<html>
<head>
	<title>How To File Upload Using Node.js - Websolutionstuff</title>
</head>
<body>
    <h1>How To File Upload Using Node.js - Websolutionstuff</h1>
    <form action="/uploadFile" enctype="multipart/form-data" method="POST">
        <span>Upload File: </span>
        <input type="file" name="pic" required/> <br>
        <input type="submit" value="submit">
    </form>
</body>
</html>
now create an index.js file in your app directory. and copy the below code in the index.js file
const express = require("express")
const path = require("path")
const multer = require("multer")
const app = express()

app.set("views",path.join(__dirname,"views"))
app.set("view engine","ejs")

var storage = multer.diskStorage({
    destination: function (req, file, cb) {
        cb(null, "uploads")
    },
    filename: function (req, file, cb) {
      cb(null, file.fieldname + "-" + Date.now()+".jpg")
    }
  })

const maxSize = 1 * 1000 * 1000;

var upload = multer({
    storage: storage,
    limits: { fileSize: maxSize },
    fileFilter: function (req, file, cb){

        var filetypes = /jpeg|jpg|png/;
        var mimetype = filetypes.test(file.mimetype);

        var extname = filetypes.test(path.extname(
                    file.originalname).toLowerCase());

        if (mimetype && extname) {
            return cb(null, true);
        }

        cb("Error: File upload only supports the "
                + "following filetypes - " + filetypes);
      }

}).single("pic");

app.get("/",function(req,res){
    res.render("File_upload_form");
})

app.post("/uploadFile",function (req, res, next) {

    upload(req,res,function(err) {

        if(err) {
            res.send(err)
        }
        else {
            res.send("Successfully Image uploaded..!")
        }
    })
})
app.listen(3000);
and your file structure like the below image.
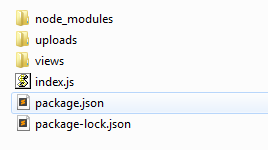
Note: create an uploads folder in the app to store files.
run index.js using the below code
node index.js
and after running this command you will get output like the below screenshot.

You May Also Like:
-
Read Also: Laravel 8 Image Upload Example
-
Read Also: How To Install VueJs In Laravel
-
Read Also: Drag and Drop File Upload Using Dropzone js in Laravel 8
Recommended Post
Featured Post

How To Validate Phone Number U...
In this article, we will see how to validate phone numbers using jquery. We will learn different methods of validat...
Oct-24-2022

How To Fixed Header In Datatab...
Data presentation and organization are easier with data tables. They help display information in an organized way. These...
Jan-05-2023

Laravel 9 QR Code Generator Ex...
In this article, we will see laravel 9 QR code generator example. As per the current trend, many websites and appli...
Mar-25-2022

Top 12 Tips To Improve React J...
In the dynamic world of web development, staying ahead of the curve is essential, and in 2023, React JS continues to be...
Aug-28-2023