Laravel 10 Send Bulk Mail Using Queue
Websolutionstuff | Mar-13-2023 | Categories : Laravel PHP
In this article, we will see laravel 10 send bulk mail using a queue. Here, we will learn about how to send bulk mail using a queue in laravel 10. Laravel queue is used for sending bulk mail with a background process.
As we know if we are sending single mail in the laravel application it is working properly without taking more time but if you want to send multiple emails in laravel then it will take too much time and also you can not do any operation during this time periods.
So, let's see how to send bulk mail using a queue in laravel 10, how to send bulk mail in laravel 10 using a queue, laravel 10 send an email, and send mail in laravel 10.
In this step, we will install laravel 10 using the following command.
composer create-project --prefer-dist laravel/laravel laravel_10_send_mail
Now, we will set up the mail configuration in the .env file as below. Here we have used mailtrap.io. So, you can use it as per your requirements.
MAIL_MAILER=smtp
MAIL_HOST=smtp.mailtrap.io
MAIL_PORT=2525
MAIL_USERNAME=your_username
MAIL_PASSWORD=your_passowrd
MAIL_ENCRYPTION=TLS

QUEUE_DRIVER=database
In this step, we will create routes for sending bulk mail using the queue.
<?php

use Illuminate\Support\Facades\Route;

use App\Http\Controllers\SendMailController;

/*
|--------------------------------------------------------------------------
| Web Routes
|--------------------------------------------------------------------------
|
| Here is where you can register web routes for your application. These
| routes are loaded by the RouteServiceProvider within a group which
| contains the "web" middleware group. Now create something great!
|
*/

Route::get('send/mail', [SendMailController::class, 'sendMail'])->name('send_mail');
Now, we will create a jobs table in the database. So, copy the below command and run it in your terminal.
php artisan queue:table
php artisan migrate
In this step, we will create SendMailController using the following command.
php artisan make:controller SendMailController
app/Http/Controllers/SendMailController.php
<?php

namespace App\Http\Controllers;

use Illuminate\Http\Request;

class SendMailController extends Controller
{
    public function sendMail(Request $request)
    {
    	$details = [
    		'subject' => 'Test Notification'
    	];

        $job = (new \App\Jobs\SendQueueEmail($details))
            	->delay(now()->addSeconds(2));

        dispatch($job);
        echo "Mail send successfully !!";
    }
}
Now, we will create the SendQueueEmail.php file using the following command.
php artisan make:job SendQueueEmail
app/Jobs/SendQueueEmail.php
<?php

namespace App\Jobs;

use Illuminate\Bus\Queueable;
use Illuminate\Contracts\Queue\ShouldQueue;
use Illuminate\Foundation\Bus\Dispatchable;
use Illuminate\Queue\InteractsWithQueue;
use Illuminate\Queue\SerializesModels;
use App\User;
use Mail;

class SendQueueEmail implements ShouldQueue
{
    use Dispatchable, InteractsWithQueue, Queueable, SerializesModels;
    protected $details;
    public $timeout = 7200; // 2 hours

    /**
     * Create a new job instance.
     *
     * @return void
     */
    public function __construct($details)
    {
        $this->details = $details;
    }

    /**
     * Execute the job.
     *
     * @return void
     */
    public function handle()
    {
        $data = User::all();
        $input['subject'] = $this->details['subject'];

        foreach ($data as $key => $value) {

            $input['name'] = $value->name;
            $input['email'] = $value->email;

            \Mail::send('mail.mailExample', [], function($message) use($input){
                $message->to($input['email'], $input['name'])
                    ->subject($input['subject']);
            });
        }
    }
}
In this step, we will create a mailExample.blade.php file. So, add the following code to that file.
resources/views/mail/mailExample.blade.php
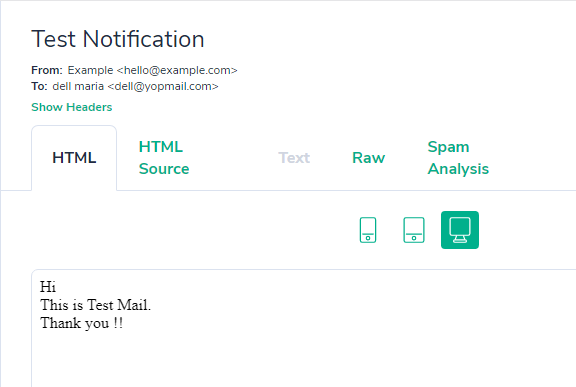
Hi <br/>
This is Test Mail.<br />
Thank you !!
And run the below command in your terminal to send manually mail.
php artisan queue:listen
Output:

You might also like:
- Read Also: How To Validate Email Using jQuery
- Read Also: How To Send Mail Using Gmail In Laravel 9
- Read Also: How To Generate PDF and Send Email In Laravel 8
- Read Also: How To Check Email Already Exist Or Not In Laravel
Recommended Post
Featured Post

How To Change Datepicker Start...
In this tutorial, I will guide you through the process of changing the start date of a datepicker component in Angular 1...
Jul-03-2023

Multiple Row Grouping Datatabl...
In this article, we will see how to row group in datatable in jquery. Datatables doesn't have row grouping buil...
Jun-04-2022

How To Hide Toolbar In Summern...
In this small tutorial i will show you How To Hide Toolbar In Summernote Editor, many times customer's have req...
Sep-02-2020

How To Disable Past Date In jQ...
In this tutorial, we will see how to disable past dates in jquery datepicker. In the date picker, today's date...
Jun-18-2022