Stripe Payment Gateway Integration Example In Laravel 8
Websolutionstuff | Nov-26-2020 | Categories : Laravel PHP
In this article, we will see a stripe payment gateway integration example in laravel 8. The stripe payment gateway is integrated into many websites for payment collection from clients. At this time many e-commerce websites and other online shopping websites use stripe payment gateway. Stripe is a simple way to accept payments online. Stripe has no setup fees, no monthly fees, and no hidden costs.
So, let's see laravel 8 stripe payment gateway integration step by step.
How To Integrate Stripe Payment Gateway In Laravel 8
Step 1: Install Laravel 8
Step 2: Install Stripe Package In Laravel
Step 3: Configuration of Stripe
Step 4: Create Route
Step 5: Add Controller
Step 6: Create a Blade file for View
Step 7: Run Example
In this step, we will install laravel 8 for this stripe payment gateway integration example in laravel 8.
composer create-project --prefer-dist laravel/laravel laravel_stripe
In this step, we are installing the stripe package in laravel 8 using the composer command.
composer require stripe/stripe-php
Now, we are configuring the stripe payment gateway as per images and code.
And you can see the stripe dashboard in the below image, in this image you can see the key and secret key of the stripe.
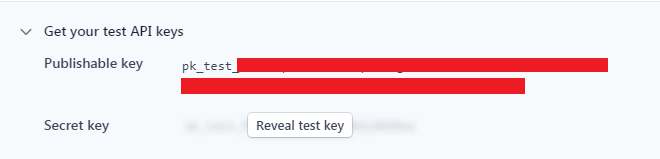
Now, open the .env file from your project and copy the below code.
STRIPE_KEY=pk_test_xxxxxx
STRIPE_SECRET=sk_test_xxxxxx
After that, we need to set up the Stripe API key, open the config/services.php file, and add the below code.
'stripe' => [
     'secret' => env('STRIPE_SECRET'),
],
In this step, we will create a route in the web.php file.
<?php

use Illuminate\Support\Facades\Route;
use App\Http\Controllers\StripeController;

Route::get('stripe', [StripeController::class, 'stripe']);
Route::post('stripe', [StripeController::class, 'stripePost'])->name('stripe.post');
Now, we will create StripeController and add the below code to the controller.
<?php

namespace App\Http\Controllers;
use Session;
use Stripe;

use Illuminate\Http\Request;

class StripeController extends Controller
{
    public function stripe()
    {
        return view('stripe');
    }

    public function stripePost(Request $request)
    {
        Stripe\Stripe::setApiKey(env('STRIPE_SECRET'));
        Stripe\Charge::create ([
                "amount" => 100*100,
                "currency" => "INR",
                "source" => $request->stripeToken,
                "description" => "This payment is testing purpose of websolutionstuff.com",
        ]);

        Session::flash('success', 'Payment Successful !');

        return back();
    }
}
In this step, we have created stripe.blade.php for view purposes. So, add the below code.
<!DOCTYPE html>
<html>
   <head>
      <title>Stripe Payment Gateway Integration Example In Laravel 8- websolutionstuff.com</title>
      <link rel="stylesheet" href="https://stackpath.bootstrapcdn.com/bootstrap/4.5.2/css/bootstrap.min.css">
      <script src="https://ajax.googleapis.com/ajax/libs/jquery/3.5.1/jquery.min.js"></script>
   </head>
   <body>
      <div class="container">
         <div class="row">
          <h3 style="text-align: center;margin-top: 40px;margin-bottom: 40px;">Laravel 8 Stripe Payment Gateway Integration Example - websolutionstuff.com</h3>
            <div class="col-md-6 col-md-offset-3">
               <div class="panel panel-default credit-card-box">
                  <div class="panel-heading" >
                     <div class="row">
                        <h3>Payment Details</h3>
                        <div>
                           <img class="img-responsive pull-right" src="http://i76.imgup.net/accepted_c22e0.png">
                        </div>
                     </div>
                  </div>
                  <div class="panel-body">
                     @if (Session::has('success'))
                     <div class="alert alert-success text-center">
                        <a href="#" class="close" data-dismiss="alert" aria-label="close">×</a>
                        <p>{{ Session::get('success') }}</p><br>
                     </div>
                     @endif
                     <br>
                     <form role="form" action="{{ route('stripe.post') }}" method="post" class="require-validation" data-cc-on-file="false" data-stripe-publishable-key="{{ env('STRIPE_KEY') }}" id="payment-form">
                        @csrf
                        <div class='form-row row'>
                           <div class='col-xs-12 col-md-6 form-group required'>
                              <label class='control-label'>Name on Card</label>
                              <input class='form-control' size='4' type='text'>
                           </div>
                           <div class='col-xs-12 col-md-6 form-group required'>
                              <label class='control-label'>Card Number</label>
                              <input autocomplete='off' class='form-control card-number' size='20' type='text'>
                           </div>
                        </div>
                        <div class='form-row row'>
                           <div class='col-xs-12 col-md-4 form-group cvc required'>
                              <label class='control-label'>CVC</label>
                              <input autocomplete='off' class='form-control card-cvc' placeholder='ex. 311' size='4' type='text'>
                           </div>
                           <div class='col-xs-12 col-md-4 form-group expiration required'>
                              <label class='control-label'>Expiration Month</label>
                              <input class='form-control card-expiry-month' placeholder='MM' size='2' type='text'>
                           </div>
                           <div class='col-xs-12 col-md-4 form-group expiration required'>
                              <label class='control-label'>Expiration Year</label>
                              <input class='form-control card-expiry-year' placeholder='YYYY' size='4' type='text'>
                           </div>
                        </div>
                      {{-- <div class='form-row row'>
                         <div class='col-md-12 error form-group hide'>
                            <div class='alert-danger alert'>Please correct the errors and try
                               again.
                            </div>
                         </div>
                      </div> --}}
                        <div class="form-row row">
                           <div class="col-xs-12">
                              <button class="btn btn-primary btn-lg btn-block" type="submit">Pay Now</button>
                           </div>
                        </div>
                     </form>
                  </div>
               </div>
            </div>
         </div>
      </div>
   </body>
</html>
<script type="text/javascript" src="https://js.stripe.com/v2/"></script>
<script type="text/javascript">
$(function() {
  var $form = $(".require-validation");
  $('form.require-validation').bind('submit', function(e) {
    var $form = $(".require-validation"),
    inputSelector = ['input[type=email]', 'input[type=password]', 'input[type=text]', 'input[type=file]', 'textarea'].join(', '),
    $inputs = $form.find('.required').find(inputSelector),
    $errorMessage = $form.find('div.error'),
    valid = true;
    $errorMessage.addClass('hide');
    $('.has-error').removeClass('has-error');
    $inputs.each(function(i, el) {
        var $input = $(el);
        if ($input.val() === '') {
            $input.parent().addClass('has-error');
            $errorMessage.removeClass('hide');
            e.preventDefault();
        }
    });
    if (!$form.data('cc-on-file')) {
      e.preventDefault();
      Stripe.setPublishableKey($form.data('stripe-publishable-key'));
      Stripe.createToken({
          number: $('.card-number').val(),
          cvc: $('.card-cvc').val(),
          exp_month: $('.card-expiry-month').val(),
          exp_year: $('.card-expiry-year').val()
      }, stripeResponseHandler);
    }
  });

  function stripeResponseHandler(status, response) {
      if (response.error) {
          $('.error')
              .removeClass('hide')
              .find('.alert')
              .text(response.error.message);
      } else {
          /* token contains id, last4, and card type */
          var token = response['id'];
          $form.find('input[type=text]').empty();
          $form.append("<input type='hidden' name='stripeToken' value='" + token + "'/>");
          $form.get(0).submit();
      }
  }
});
</script>
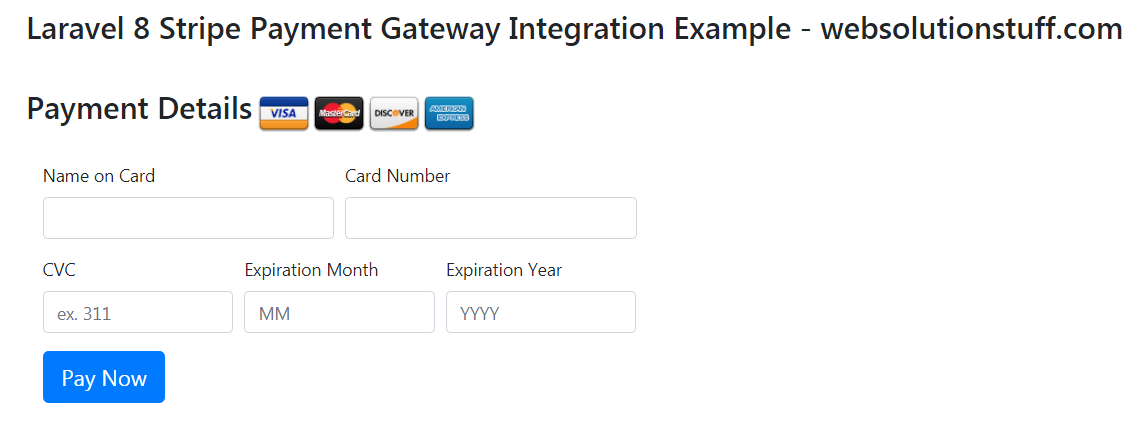
And you will get the below output for the same.
Card Name: Test // any other name you can use here
Card Number: 4242424242424242
Month: Any Future Month
Year: Any Future Year
CVV: 123
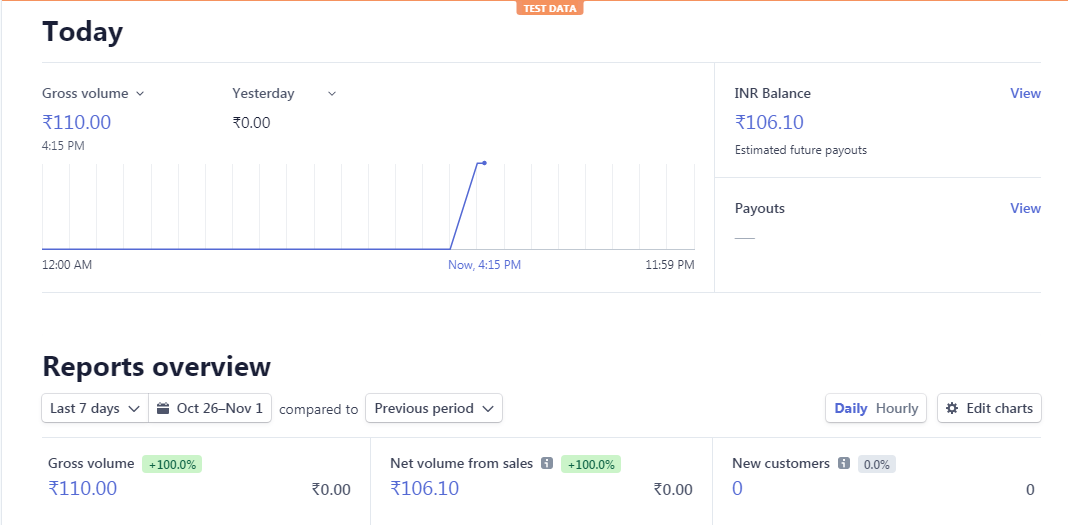
Now, run this stripe payment gateway integration example in laravel 8 on your server or project after successful payment you can see the dashboard of the stripe like the below image.
You might also like:
- Read Also: Laravel 8 Toastr Notifications Example
- Read Also: How To Create Dynamic Pie Chart In Laravel 8
- Read Also: How To Toggle Dark and Light Mode using jQuery
- Read Also: How to Integrate Razorpay Payment Gateway in Laravel
Recommended Post
Featured Post

How to Upgrade PHP 8.0 to 8.1...
Hey there! I recently needed to upgrade my PHP version from 8.0 to the latest 8.1 on my Ubuntu server. It's a smart...
Nov-03-2023

How To Get Current Month Recor...
In this tutorial, we will see how to get current month records in MySQL. For data analysis and reporting, we need more d...
Feb-08-2022

How To Redirect Another Page U...
In this article, we will see how to redirect another page using javascript. we will redirect the page to another pa...
Nov-04-2022

How to Create New Project in A...
As a beginner, diving into a new framework like Angular 17 can seem daunting, but fear not! I'll guide you through c...
Mar-20-2024